Wednesday 29 January 2014

Hogwarts In The Snow

As most of my friends and family know, I always have and probably always will love Harry Potter with all my heart. In fact, I think it was the first series of books I read at the eager age of Seven! So when the Warner Brothers Studio Tour was announced two (?) years ago, I knew I had to go. It was as magical and perfect as I thought it would be, but nothing could have prepared me for the announcement of Hogwarts In The Snow!

 We actually visited the Studio Tour on January 6th, so this post is a tad late. I hope you don't mind as I really wanted to show you all how magical and christmassy they had made it. Luckily for us, we managed to see the last day of the Christmas set up in the great hall, before it just transitioned into Hogwarts In The Snow (which is in fact still featured until February 2nd!) I was overwhelmed enough by being in the great hall the first time round, so seeing it all festive made my inner 7 year old squeal with excitement.

The decorations were just perfect, all of the place settings had matching house Christmas crackers, surrounded by ceramic and real (much to my surprise) seasonal food, with all of the trees colour co-ordinated to the right houses. It was just incredible to see how much detail the set designers went to in order to give it that festive feel - it was 'snowing' outside the windows, and to make the Christmas Trees just that bit more magical, they had flying witches circling the top!


One of my favourite things about Harry Potter is the costume and hair variations, so seeing all the wigs and prosthetics that they used in the films was wonderful. To know that Evanna Lynch's hair wasn't that long or flowing or perfect, it was  a wig, made my envy of her just slightly reduce! I'm fascinated by how makeup and hair and costume can change a character completely so seeing all the sketches and costume ideas is one of my favourite things about this tour.

I have to say, my favourite costumes of the whole film are definitely the Malfoys collection. They're so dark and plain, yet so iconic and powerful. It's funny how you can just glance at their costumes and know which characters they belong to, yet another awesome thing that the HP crew managed to achieve.


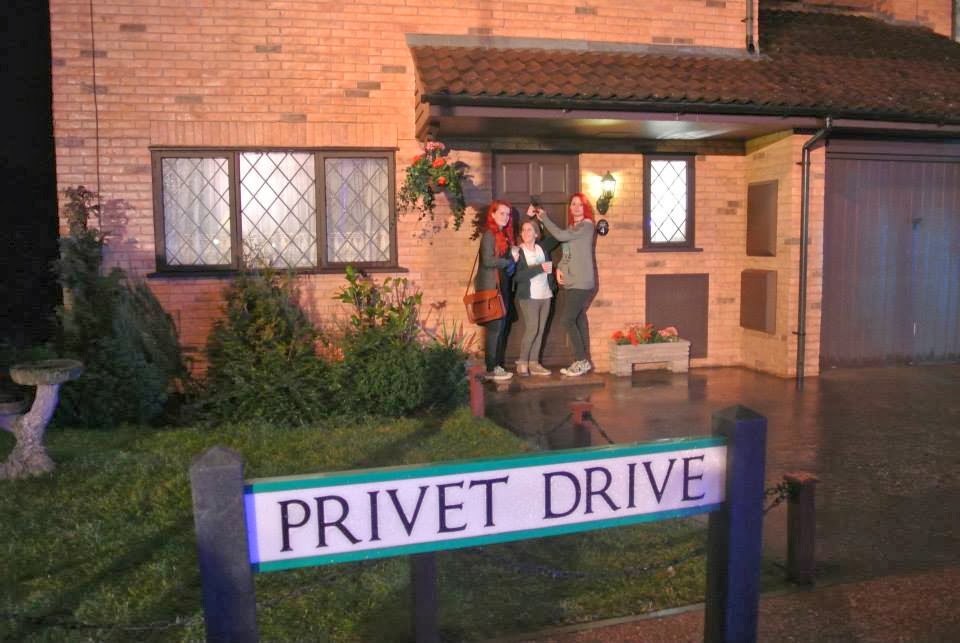
One of the cool things about this tour is that they've left the Privet Drive set so you can visit the street and take pictures, something I've actually always wanted to see. I didn't actually realise it wasn't a real street until I visited the tours...


I have to say my all time favourite set from the whole tour is the potions room. The fact that all the bottles surrounding the walls featured hand written labels, or that the potions books were hand written show just how much care and intricacy have gone into the whole film. Even the minor details are treated as if they are a key part of the scene. All the cauldrons in this set have stirring spoons moving constantly to make it feel like you're actually in Hogwarts yourself!


Now back to the Christmas side! The Gryffindor boys dormitory was surrounded with tinsel EVERYWHERE. Wrapped around all the boys individual beds (you can suss out who's is who due to the things on their bedside tables) and taped to the walls. If you got a chance to go and look closely, you would have seen that on every table their featured various hand made Christmas cards from student's, all with magical themes. I like the fact that the decorations are homely and juvenile, it meant they fit in perfectly with Harry's idea of hogwarts being his home.

Last but definitely not least, the Hogwarts castle. Fun fact for you all, the first time I went, the castle actually made me shed a tear. It's actually quite overwhelming to see something so spectacular and close to your heart. 
This time was no different, in fact, it was better. The entire castle is covered in snow, with snowmen and footprints everywhere.  The picture really doesn't do justice to how festive this makes you feel. And this, for me, was the thing that showed me how much care and effort was put into these films. The castle has all individual windows, turrets, doors and gateways and it features every part of the Hogwarts grounds - from Hagrids Hut to the Boat House in which snape died (*crys*). It's bigger than I had imagined it to be, and to truly take in all of the detail, I imagine you'd be there for hours!


Thanks for reading, I hope you enjoyed it!
Lucy 
xx


All photos taken by my friend, Elysha Richards

Sunday 26 January 2014

Mini Lush Haul

So today I went to Southampton for the first time since Christmas to finally do some shopping for myself (yipee!) and of course, being a sucker for lush products, I had to pop in and buy some old favourites and also, test out some different things!
Also, sorry if the images are pretty low quality, my camera died and I've had to use my iPhone!

I actually only bought 4 products this time as I've had to start restricting my spending because of car buying etc (oh the joys of turning 17 on Friday), but I'm pretty pleased with what I did get. I'll start off with the products I purchased today that I've never used before;

Dreamtime Bath Melt
£3.25

Butterball Bath Bomb
£2.50


The first product that caught my eye in the shop was the lush Butterball Bath Bomb, I tend to get
extremely dry skin in the winter months and I'm always looking out for products to give me a moisture boost. This one seemed perfect as it was advertised as replenishing thirsty skin. The smell is absolutely delicious, it has a hint of vanilla, one of my favourite scents around winter. I cannot wait to try this one out to see if the cocoa butter ingredients help to revitalise my dry skin! My only downside about this bath bomb is that it won't turn my bath a pretty colour... sigh.
The Dreamtime Bath Melt was actually a product I've been wanting to try out for ages since I spotted it on the lush website. I'm an absolute sucker for lavender as it always reminds me of my Grandmother and is the only thing that helps me sleep on the nights in which sleep seems impossible. SO... this product seemed like a must have as not only does it smell of lavender, it aids sleep!
Just as a warning, if you're not a fan of lavender, I'd stay away from this as the smell is rather strong and I imagine, quite overwhelming for some! I adore the design of it too, you can see the pieces of chamomile (I think?) in the bar and it has 'dreamtime' stamped on the bar (which you can't actually see because well, crappy iPhone quality!) , once again, a simple but sweet design by lush. I cannot wait to try this one, I think it may be a new favourite!

Think Pink Bath Bomb
£2.50

The Comforter
£4.50


Now for the tried and tested!
The Think Pink Bath Bomb was actually the first bath bomb I purchased from lush, I was automatically drawn in by its pretty colours and flowers. I tend to always buy this one as it's incredibly cheap at only £2.50 a pop, and smells lovely! It's quite a light, florally scent and definitely isn't as overwhelming as a lot of other lush products seem to be, but I quite like that as it gives me a relaxing bath without a really strong scent. This is the one I seem to use when I'm feeling pretty, well, bland! My favourite thing about this product is definitely the little heart confetti that's inside, it makes my bath feel a bit more special and luxurious (the fact that they dissolve by the end of it is a plus too, means no mess!)

Finally, one of my favourite all year round lush products, The Comforter! I think I've lost count of how many times I've purchased this Bubble Bar. Once again, the first thing that drew me too it was the bright colours, and the smell is divine. It brought back childhood memories of my favourite blackcurrant sweets and it's quite a nice smell to use in winter as it really lifts my mood with its fruity fragrance. At £4.50 I initially thought it was pretty expensive for one use, until I discovered it's for multiple baths!
Lush actually recommend you crumble half a bar at a time, but I've found I can get 4-6 baths worth out and still get the gorgeous pink colour and the blackcurrant smell. This bubble bar actually does what the name says - comforts you! I always use it when I'm stressed out or just need to take a breath, and I always leave the bath feeling calmed and comforted!

Hope you enjoyed this post, comment below with your favourite lush products!
Until next time,
Lucy 
xx

Wednesday 22 January 2014

TIGI S Factor Review

Helloo, as my everyday makeup routine went down surprisingly well, today I'm gonna review some TIGI hair products!

As I dye my hair quite frequently, it tends to become quite dry, dull and frizzy, so I'm always looking out for nourishing shampoos and conditioners to give my hair a little boost. For years now I've been using Herbal Essences 'Ignite My Colour' and whilst it does make my hair feel like it's in better condition, it doesn't really give it a vibrant shine.
After seeing the TIGI products on a Zoella video, I decided to look at the products and give them a go. At the moment I have three TIGI products, TIGI S Factor True Lasting Colour Shampoo and Conditioner, and TIGI S Factor Smoothing Lusterizer.

The first product I'm going to talk about is the True Lasting Colour Shampoo and Conditioner (750ml). I absolutely adore the packaging on the whole TIGI range, it's simple but still looks lovely. The first thing I noticed about this product is it's delicious smell, it's a light coconut and almond scent and makes my hair smell divine! 
Using it for the first time, I honestly thought it would dry out my hair completely by the way it felt in the shower. I'm not sure if I'm the only person that, when wet, had hair that felt like straw after using this? However, when it was dry my hair had such a beautiful, vibrant shine to it, the healthiest looking my hair has been in a long time. I was also extremely surprised by the intensity of the colour it left my hair with, as having faded red hair has left me with a dull orange/red colour but after using this product, it looked glossy and sleek. 
I would definitely recommend this product to anyone who colours their hair and is after a decent, salon quality product at a reasonable price. I actually bought mine in the feel unique sale, so I got the two 750ml bottles for around £26.90 (!!!), I think it's normal price is around £33.95? With bottles this big, I can tell this product is going to last me a very, very long time!
The second product I use is the Smoothing Lusterizer Defrizzer & Tamer.
Naturally I have always had stupidly wavy and frizzy hair and the recent years of dying and bleaching it have not helped with the situation. I've tried countless de-frizzing products but always felt my hair was left heavy and sticky by the thickness of the serum inside.
It's a completely different story with this product. I fell in love with this when it arrived, firstly because of the scrumptious strawberries and cream scent and second, the lightness of the actual product.
 I used it straight away and found it actually did the job, it tamed my frizzy mane and left my hair looking sleek and professional. Not only did it smooth my hair, it made it look healthy and shiny due to the shimmering glitter of some sorts in the product that reflects the light. 
My only criticism of this product is that when I used it near the top of my hair, it automatically caused it to look greasy and flat. I think this may just be due to the closeness of the hair to my head. Unfortunately this can sometimes (on extreme frizz-days!) leave me with a half frizzy, half smooth head of hair. 
Apart from that minor flaw in the product, I can safely say this 'Lusterizer' is a life saver for my problematic hair and I'd definitely recommend this to anyone.
At £15.25 I think this is a reasonable price to pay as I've been unable to find a frizz-tamer at anything cheaper!

Overall I can safely say I love the TIGI products and I'll soon be investing in the S Factor "Serious" Conditioner and Spray Heat Defender!

Thanks for reading :)
Lucy xx

Sunday 19 January 2014

My everyday makeup routine.

Okay, so this is the first time i've done something like this, but here goes my every day makeup routine!
First thing I do is moisturise using Simple Kind to Skin Hydrating Light Moisturiser, it's nothing fancy but it does give my skin a good moisture boost without being too heavy or sticky. I leave that for around 10 minutes before applying this;
Rimmel Londons Wake Me Up Foundation. I have it in the shade Ivory, the lightest one haha! I usually find foundation makes me break out a LOT, but this one ~touch wood~ has given me fantastic coverage and I've not had a massive breakout since using it. I've found it really brightens my skin, but in the winter months I always have to apply powder as I feel it makes my skin too shiny. 
Once I've applied a light amount to my skin, I then go on to use
Maybelline Fit Me Powder.
This may seem ridiculous, but personally I really, really dislike this powder. I find it has a shimmer to it that I really don't like the look of. HOWEVER, it does remove the shine on my face without sunlight, so is perfectly fine for winter, but to be honest, i'm only using it until I can get to boots to buy a new one that actually works for me. I would not recommend this to a friend, even though its relatively cheap (£5.99) I would not buy it again.

This is the palette I use for my everyday eyeshadow. It's Benefits World Famous Neutrals Easiest Nudes Ever Kit. I actually got this palette as a christmas present and I've used it every day since, I absolutely adore it! For my every day look I use the cream eyeshadow as a base all over the lid in the shade R.S.V.P
It's a gorgeous champagne colour that applies flawlessly and doesn't crease throughout the whole day. It gives just enough colour to be noticeable, but is still incredibly subtle.
 In the outer corner and on the crease of my eyelid I apply Thanks A Latte, a gorgeous light brown shimmery colour. The pigment of this could be better to create a deeper colour, but for everyday subtle wear it's perfect for me and is noticeable on my pale skin. Across the browbone I apply Call My Buff, a shimmery, pale, yellowish colour that highlights my brow bone. I also apply it into the inner corner of my eyes to open them up.
This is what the eyeshadow looks like after i've applied it.
As it's a quite subtle look, I then apply winged eyeliner using the Rimmel Scandal Eyes Precision Micro Liner pen.
I've been a massive fan of winged liner for around four years, yet i somehow only discovered eyeliner pens last year, they are a saviour and are the only way I've been able to get similar wings. At first this pen was very precise and had a very black pigment, after having it for a while the end of the pen has become quite weak, making it harder to get a precise point. Also, as the eyeliner is being used up, it gets harder to gain the strong black pigment. But for £3.49 its a complete bargain and worth the price!
Lastly, I apply Rimmel Lash Accelerator Endless Mascara in extreme black (I know, there's a rimmel theme haha!) The brush is quite small which personally, I love. It is my new favourite mascara as it lengthens my lashes to the point of some people thinking I'm wearing Falsies, but does not clump them together. For £5.99 I felt it was quite good value.


I hope this was good/useful/idk worth it?
Thanks for reading 
Lucy xo


Hey!!

Well, Hi!
I'm Lucy, a 16 year old girl from Southampton, a city in England.
I adore reading books, ~trying~ to do makeup nicely and well, going on the internet.
Essentially this post is to explain what this blog is gonna be, i'm gonna try and do a mix of different things, book reviews, film reviews, makeup posts and just general life events. I've decided that if I'm gonna procrastinate from my College work, the procrastination should be at least some form of productive!!
So welcome, 
feel free to email me if you want to chat; lucycollingwood97@gmail.com
or speak to me on tumblr http://uolycul.tumblr.com/ask
or tweet me ^^ http://twitter.com/Luucy_3